Showing posts with label LockdownPosts. Show all posts

13 April 2020

Making SOAP Request using Postman

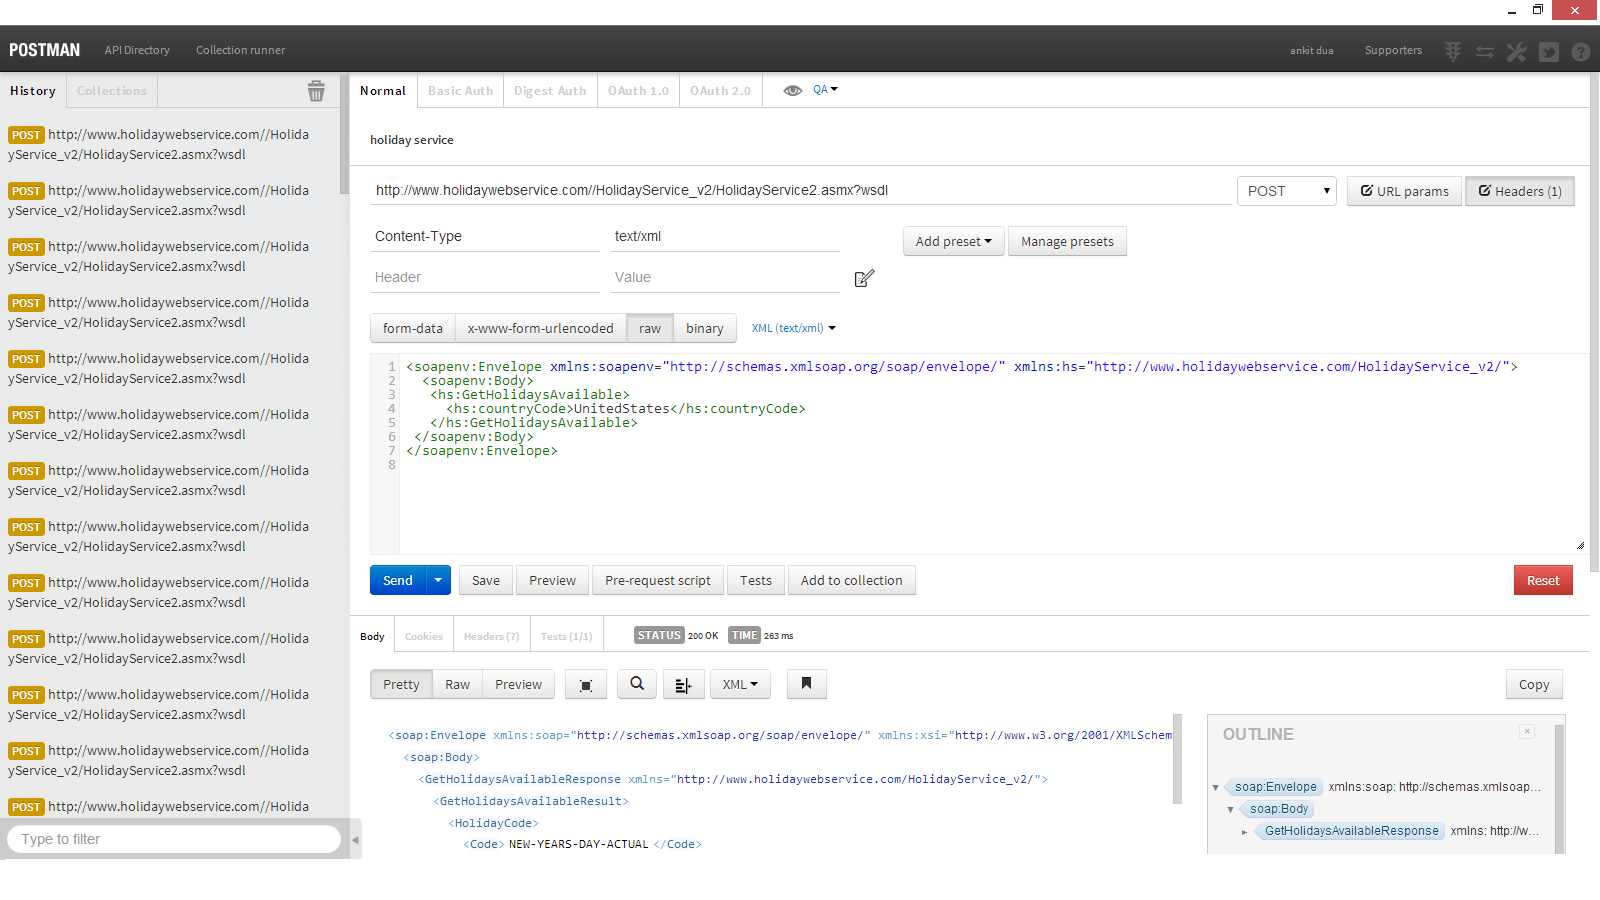
Sample WSDL using Postman client of chrome for testing SOAP webservices

WSDL:
http://www.holidaywebservice.com//HolidayService_v2/HolidayService2.asmx?wsdl
Authorization: no Auth
Headers: Content-Type = text/xml
Body:  Select "raw" type with XML(text/xml) format

Select POST option and send below payloads to get response.

Payload for GetCountriesAvailable:
==================================

<soapenv:Envelope xmlns:soapenv="http://schemas.xmlsoap.org/soap/envelope/" xmlns:hs="http://www.holidaywebservice.com/HolidayService_v2/">
 <soapenv:Body>
 <hs:GetCountriesAvailable></hs:GetCountriesAvailable>
 </soapenv:Body>
</soapenv:Envelope>

Payload for getHolidaysAvailable method defined in this WSDL, give the request body as:
=======================================================================================

<soapenv:Envelope xmlns:soapenv="http://schemas.xmlsoap.org/soap/envelope/" xmlns:hs="http://www.holidaywebservice.com/HolidayService_v2/">
 <soapenv:Body>
 <hs:GetHolidaysAvailable>
 <hs:countryCode>UnitedStates</hs:countryCode>
 </hs:GetHolidaysAvailable>
 </soapenv:Body>
</soapenv:Envelope>


Payload for GetHolidayDate method defined in this WSDL, give the request body as:
=======================================================================================

<soapenv:Envelope xmlns:soapenv="http://schemas.xmlsoap.org/soap/envelope/" xmlns:hs="http://www.holidaywebservice.com/HolidayService_v2/">
 <soapenv:Body>
 <hs:GetHolidayDate>
 <hs:countryCode>UnitedStates</hs:countryCode>
 <hs:holidayCode>NEW-YEARS-DAY-ACTUAL</hs:holidayCode>
 <hs:year>2017</hs:year>
 </hs:GetHolidayDate>
 </soapenv:Body>
</soapenv:Envelope>

Payload for GetHolidaysForDateRange:
=====================================
<soapenv:Envelope xmlns:soapenv="http://schemas.xmlsoap.org/soap/envelope/" xmlns:hs="http://www.holidaywebservice.com/HolidayService_v2/">
 <soapenv:Body>
 <hs:GetHolidaysForDateRange>
 <hs:countryCode>UnitedStates</hs:countryCode>
 <hs:startDate>2017-01-01T00:00:00</hs:startDate>
 <hs:endDate>2018-01-01T00:00:00</hs:endDate>
 </hs:GetHolidaysForDateRange>
 </soapenv:Body>
</soapenv:Envelope>
Reference:
http://blog.getpostman.com/wp-content/uploads/2014/08/SOAP-requests-using-Postman.png?x38712

JAX WS Webservice Example

 Follow this link to create JAX-WS Web Service Deployment on Tomcat Server
https://www.journaldev.com/9133/jax-ws-web-service-deployment-on-tomcat-server
There are some additional dependencies to be added in POM.xml file
Final URL to access this SOAP webservice is
http://hyd-talakokm-l:8080/PorscheROWS/personWS?WSDL
STS Project : PorscheROWS.zip
Payload:
getAllPersons
<soapenv:Envelope xmlns:soapenv="http://schemas.xmlsoap.org/soap/envelope/" xmlns:hs="http://hyd-talakokm-l:8080/PorscheROWS/personWS">
 <soapenv:Body>
 <hs:getAllPersons>
 </hs:getAllPersons>
 </soapenv:Body>
</soapenv:Envelope>

MongoDB

How to Install of MongoDB Community Edition:
To install MongoDB on Windows, first download the latest release of MongoDB from https://www.mongodb.org/downloads. Make sure you get correct version of MongoDB depending upon your Windows version. To get your Windows version, open command prompt and execute the following command.

C:\>wmic os get osarchitecture
OSArchitecture
64-bit

MongoDB requires a data folder to store its files. The default location for the MongoDB data directory is c:\data\db. So you need to create this folder using the Command Prompt. Execute the following command sequence.

C:\>md data
C:\md data\db

How to start mongo server
In the command prompt, navigate to the bin directory present in the MongoDB installation folder. Suppose my installation folder is D:\set up\mongodb

D:\set up\mongodb\bin>mongod.exe --dbpath "d:\set up\mongodb\data"
or
C:\Program Files\MongoDB\Server\3.6\bin>mongod.exe

This will show waiting for connections message on the console output, which indicates that the mongod.exe process is running successfully.

if you want to start mongo server with default data folder (c:\data\db) in listening mode then just run "mongod.exe" to run the server.

Now to run the server run below command from bin directory
mongo.exe

from db shell you can make a test like
db.test.save({a:1})
db.test.find()
create db with name dotDB
create collection/table with name project and template for DOT project.

Format below text in free time:
run mongo to connect to mongo instance
db.stats() to know db statistics
use dotDB
to switch to dotDB
show dbs
to list the databases in the system.

show collections

db.project.find({$and:[{"_id":"5ad07524acf885c26770e208"}]}).pretty()

db.project.find({$and:[{"projectName":"Demo Project"}]}).pretty()

db.project.find({$and:[{"_id":ObjectId(5ad07524acf885c26770e208)}]}).pretty()


db.project.update({"projectName":"Demo Project"},{$set:{'projectName':'237998'}})

db.project.update({"projectName":"237998"},{$set:{"platforms":[{"_id":null,"platformName":"FLEX","platformCode":"drive_flex","selected":true}]}})


Creating your first Spring Boot application

Refence: Plural Sight Course : Creating your first Spring Boot application:

create a maven project with by setting groupId as com.boot and artifactId as das-boot and version as 0.0.1-SNAPSHOT and packaging as jar.

we need to add parent to pom.xml
<parent>
    <groupId>org.springframework.boot</groupId>
    <artifactId>spring-boot-starter-parent</artifactId>
    <version>1.3.1.RELEASE</version>
</parent>

and in dependencies of pom.xml add
      <dependency>
          <groupId>org.springframework.boot</groupId>
          <artifactId>spring-boot-starter-web</artifactId>
      </dependency>

go to sr/main/java/App.java
and add
@SpringBootApplication
before the class
in the main method add
SpringApplication.run(App.class, args);

in src/main/java create package with names
controller
model
repository
service
under controller create a file HomeController.java
and add below content


package com.boot.controller;

import org.springframework.web.bind.annotation.RequestMapping;
import org.springframework.web.bind.annotation.RestController;

@RestController
public class HomeController {

    @RequestMapping("/")
    public String home() {
        return "Das Boot, reporting for duty!";
    }
}
Right click app.java and select run as java application to see response at localhost:8080


Learning Path for Spring Boot
1. Maven Fundamentals - done
2. Spring Fundamentals - done
3. Introduction to Spring MVC4
4. Spring Security Fundamentals
5. Spring with JPA and Hibernate
6. Getting Started with Spring Data JPA
7. Getting  Started with Spring Data REST

for references go to spring.io.
To generate new basic project go to start.spring.io (web initializer).
command line Spring Boot CLI, which inturn uses api provided by start.spring.io.
https://docs.spring.io/spring-boot/docs/current/reference/html/getting-started-installing-spring-boot.html#getting-started-installing-the-cli

How does spring boot work?
@SpringBootApplication :A convinience annotation that wraps commonly used annotations with spring boot.
@Configuration : Spring configuration on startup. various configurations used by string.
@EnableAutoConfiguration: any components it finds in class path, it wires automatically to spring boot.
@ComponentScan : scans project for spring components


to know more information about any annotation, click on annotation and press F3. It will give more information.

Why move to containerless deployments?
in container deployments we have to deploy our java application to JBOSS or Tomcat container.
Problems with Container Deployments:
1. container need to be setup for each environment (pre-setup and configuration).
2. Need to use deployment descriptor files like web.xml to tell container how to work.
3. container envioronment settings which are external to your application.
Use of Application Deployments (Containerless deployments)
1. Runs anywhere java is setup (like cloud deployments)
2. Container is embedded and the app directs how the container works.
3. runs as plain java application which eases debugging.
Spring boot uses Embedded container or container less deployments.

=> We can copy the ui related files like angular code directly to src/main/resources/public directory, right click on project and select refresh. To make src/main/resources as class path resource, right click select Maven -> Update Project (Alt+F5).
=> Any change in html file in src/main/resources/public directory is reflected immediately.
=> All rest features in spring boot application are provided by spring mvc.
application.properties is the file we can set properties of application when we move one environment to another environment.
maven configured the build such that src/main/resources is in class path. so create application.properties in this folder. some example of application properties is to increase loggging level.
Example:
logging.level.org.springframework.web=DEBUG
server.port=8181
we can introduce some more files like application-test.properties or application-prod.properties after creating them in same directory as application.properties.
to pick this custom properties file, right click on project → select run as → Run Configurations and go to Arguments tab to add VM arguments as -Dspring.profiles.active=test
https://docs.spring.io/spring-boot/docs/current/reference/html/common-application-properties.html
=> Search for spring boot common application properties in google to know what are all the properties available.

add below dependency to pom.xml if you want to use database
      <dependency>
          <groupId>com.h2database</groupId>
          <artifactId>h2</artifactId>
      </dependency>


after you rerun the application u would see log statement like
2018-02-23 16:04:08.761  INFO 8112 --- [           main] org.hibernate.Version                    : HHH000412: Hibernate Core {4.3.11.Final}

Add below properties to application.properties and restart the application to use h2 database.
spring.h2.console.enabled=true
spring.h2.console.path=/h2

login to db like http://localhost:8080/h2 with sa/sa credentials to connect to web based db available to spring boot application.

Add below code to application.properties and restart the application to login with sa and blank password, login and create table
spring.datasource.url=jdbc:h2:file:~/dasboot
spring.datasource.username=sa
spring.datasource.password=
spring.datasource.driver-class-name=org.h2.Driver

some more settings
spring.datasource.max-active=10
spring.datasource.max-idle=8
spring.datasource.max-wait=10000
spring.datasource.min-evictable-idle-time-millis=1000
spring.datasource.min-idle=8
spring.datasource.time-between-eviction-runs-millis=1

for flyway database setting add below dependency in pom.xml:
      <dependency>
          <groupId>org.flywaydb</groupId>
          <artifactId>flyway-core</artifactId>
      </dependency>
------------------------------------------------------------------------------------------------------------
Add @Loggable to know time taken by the specific method in console of STS:

{"@timestamp":"2018-02-01T17:51:17.366+05:30","@version":1,"message":"Total execution time taken by getClientReport ( [E200500] ) method is 119137 ms","logger_name":"com.xxxworks.reporting.serviceapi.repo.ChrDataRepoImpl","thread_name":"http-nio-8080-exec-1","level":"INFO","level_value":20000,"HOSTNAME":"HYD-TALAKOM","customFields":"{\"vendor\": \"CK.PSP\"}","vendor":"CK.PSP"}
-----------------------------------------------------------------------------------------------------------

References:
http://www.adeveloperdiary.com/java/spring-boot/create-restful-webservices-using-spring-boot/
http://www.programming-free.com/2014/07/spring-data-rest-with-angularjs-crud.html
https://docs.spring.io/spring-boot/docs/current/reference/htmlsingle/#howto-build-an-executable-archive-with-ant

Logging:
https://docs.spring.io/spring-boot/docs/1.2.0.RELEASE/reference/html/howto-logging.html
http://blog.netgloo.com/2014/12/11/logging-in-spring-boot/

Python basics

Development Environment setup instructions
Step 1: Install Anaconda on Windows, follow instructions from below link(selecting checkbox to add to PATH env variable is important):
https://medium.com/@GalarnykMichael/install-python-on-windows-anaconda-c63c7c3d1444
run below command from command prompt to get version of python
python --version
Step 2: Install nltk , run below command from command prompt.
pip install nltk
Step 3: Install flask server, run below command from command prompt.
pip install flask
Step 4: from python(run python in command prompt to get python terminal) run below commands
import nltk
nltk.download()
Step 5: PyCharm is ide for python download and install it from http://www.jetbrains.com/pycharm/?fromMenu
Step 6: download chatbotai project from stash repository and unzip it to a folder. open the project using pycharm editor and right click on app.py and select run option.
for any missing modules while running the application, you need to run pip install xxxx where xxxx is module name to resolve the issue.

Hello world program:
print ("Hello World")
copy the line to a file like test.py and run "python test.py" to see the output.
pip is package management system to install and manage packages written in python. It will come by default with python installation like anaconda software.
sample command from windows command prompt "pip install flask" this will installl flask webserver package on to your machine.
https://pypi.python.org/pypi lists the packages available in python.

10 April 2020

Evaluate a job offer from a public software company?

We can check financial health of software company by following below steps and take decision to join any Public registered organization:

Go to below website,
https://www.sec.gov/edgar/searchedgar/companysearch.html

and search for company name
in the list, select correct company name.
Then in the list of documents displayed, choose
"Quarterly report [Sections 13 or 15(d)]" or "10-Q" filings and hit on Documents link
In the list of document, choose document of type/description 10-Q to open and read through the document to find out quarterly revenue, expenses and cash assets.

This report would give last 3 months revenue report, where you can check revenue of organization and expenses of organization and net income of organization. Also you can check cash flow in the end of the document, to calculate runway period.

Burn-rate and Runway:

Cash today      /      Burn rate  =  Runway
$10000                    $1000          10 months


09 April 2020

Whats new in Java 9?

The Java Platform Module System
Java 9 released in 2017 JPMS is one of important feature of java 9.
What is a module?
A module has a name, it groups related code and is self-contained.

Java 9 Module System has a “java.base” Module. It’s known as Base Module. It’s an Independent module and does NOT dependent on any other modules. By default, all other modules dependent on “java.base”.

In java 9, modules helps you in encapsulating packages and manage dependencies. So typically,

a class is a container of fields and methods
a package is a container of classes and interfaces
a module is a container of packages

A module is typically just a jar file that has a module-info.class file at the root.
To use a module, include the jar file into modulepath instead of the classpath. A modular jar file added to classpath is normal jar file and module-info.class file will be ignored.
module-info.java

module java.base {
exports java.lang;
exports java.util;
exports java.io;
// and more
}

module-info.java

module java.sql  {
exports java.sql;
exports javax.sql;
exports javax.transaction.xa;
requires java.logging;
requires java.xml;
}


How to find jdk modules in java 9
go to command prompt / shell where java 9 installed and run commands
$java --list-modules
this will display all modules in jdk.

$java --list-modueles | grep "java\." 
// this will list modules starting with java.

$java --describe-module java.sql
output:
exports java.sql
exports javax.sql
exports javax.transaction.xa
requires java.logging transitive
requires java.base mandated
requires java.xml transitive
uses java.sql.Driver

using jdeps perform dependency analysis on main file of old project
$jdeps -jdkinternals Main.class
............
.....
...
it will suggest suggested replacement for jdk internal API.

Using Non-default Modules, adding modules to java 8 project:
$javac --add-modules java.xml.bind Main.java
$java --add-modules java.xml.bind Main

08 April 2020

Whats new in Java 8?


Java 8 Stream API and Collectors

What is Stream?
a typed interface which gives ways to efficiently process large amounts of data

A stream is an object on which one can define operations like map/filter/reduce.
It is also an object that does not hold any data.
An object that should not change the data it processes.

How can we build streams?

List persons = ...;
Stream stream = persons.stream();
stream.forEach(p -> System.out.println(p));

Example of one more operation filter in java 8:
List persons = ...;
Stream stream = persons.stream();
Stream filtered = stream.filter( person -> person.getAge() > 30);

Example of stream usage:

import java.util.function.Predicate;
import java.util.stream.Stream;

public class FirstPredicates {
 public static void main(String[] args) {
 Stream stream = Stream.of("one","two","three","four","five");
 stream.forEach(s -> System.out.println(s));

 // using predicate
 Predicate p1 = s -> s.length()>3;
 stream
    .filter(p1)
    .forEach( s -> System.out.println(s));


 // using predicate or
 Predicate p2 = Predicate.isEqual("two");
 Predicate p3 = Predicate.isEqual("three");
 stream
    .filter(p2.or(p3))
    .forEach( s -> System.out.println(s));

 }
}

Output:
one
two
three
four
five

three
four
five

two
three

Stream API defines intermediary operations
forEach()
filter(Predicate)
peek()

Mapping operation: map returns a stream, so it is intermediary operation.
Example:
List persons = ...;
Stream stream = persons.stream();
Stream names = stream
        .map( p -> p.getName());

flatMap example:
class FlatMapExample
{
public static void main(String[] args)
 {
  List list1 = Arrays.asList(1,2,3);
  List list2 = Arrays.asList(4,5,6,7);
  List list3 = Arrays.asList(8,9,10,11,12);
  List> list = Arrays.asList(list1,list2,list3);
  System.out.println(list);
  Function,Stream> flapMapper = l -> l.stream();
  list
   .stream()
   .flatMap(flatMapper)
   .forEach(System.out::println);
 }
}


Optional means there might be no result as well.
Example:
List ages = ...;
Stream stream = ages.stream();
Optional max =  stream.max(Comparator.naturalOrder());

Reductions available:
- max(),min(), count()
Boolean reductions
- allMatch(), noneMatch(), anyMatch()
Reductions that return optional
- findFirst(), findAny()

Terminal Operation : Example
List persons = ...;
Optional minAge =
persons.stream()
       .map(person -> person.getAge())
       .filter( s -> s < 20)
       .min(Comparator.naturalOrder());

There is another type  of reduction called Collectors
Collecting to string Example: Result is string with all names of people with age > 20, separated by comma

List persons = ...;
String result =
persons.stream()
       .filter(person -> person.getAge() > 20)
    .map(Person::getLastName)
    .collect(
      Collectors.joining(", ")
   );
Map> result =
persons.stream()
       .filter(person -> person.getAge() > 20)
    .collect(
      Collectors.groupingBy(Person::getAge)
   );
Map result =
persons.stream()
       .filter(person -> person.getAge() > 20)
    .collect(
      Collectors.groupingBy(
   Person::getAge,
   Collectors.counting() // it will count persons of same age
   )
   );